

Like so many other librarians and teachers, I’ve spent this school year feeling like I’m barely keeping my head above the water! Starting off 100% virtual, then phasing in different grade levels each week, to now where we have about half our school in-person and the other half virtual…it’s been hard to keep up with everything! Over the last few months, however, I have learned some things that have helped me survive and have made things easier and more fun. So I thought I would share these time savers for a hard year with you!
Bitmoji Virtual Library
First, I’m definitely happy that I joined the Bitmoji band wagon! I originally started my Virtual Library Classroom to create a fun virtual experience for my virtual students, although my in person kids have been using it too! It started off pretty simple, but the more I used it, the more involved it became! To see it in action, click here!
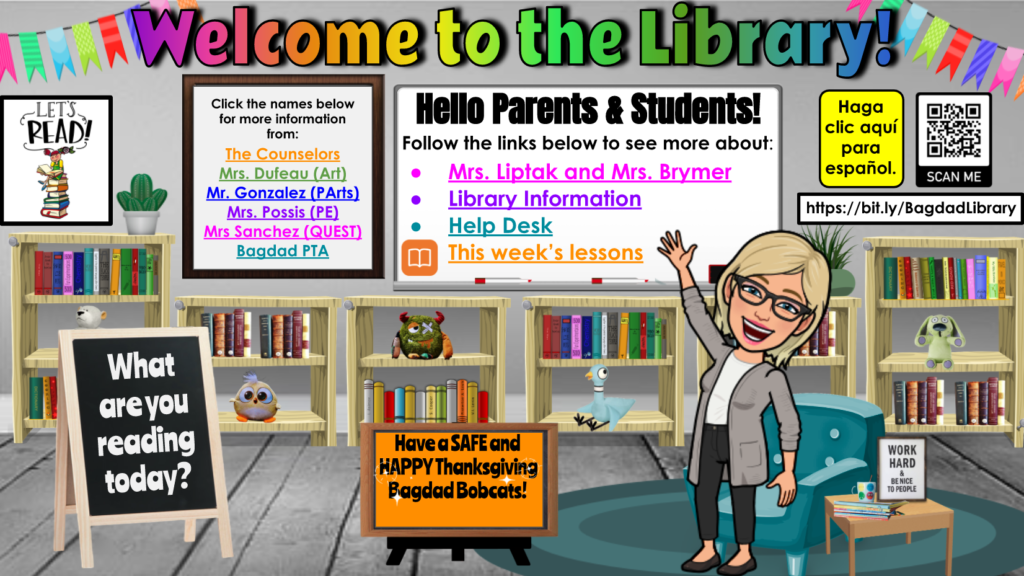
The reason I show you this is because 1) I’m pretty darn proud of it! LOL 2) More importantly, it shows you how I have everything linked ALREADY in presentation mode AND WITHOUT the slides bar! I first learned about how to do this from the AMAZING Mrs. Talk Techie! If you haven’t heard of her, I would HIGHLY suggest you follow her YouTube channel here. But be ready to spend quite some time on her channel…I sure did!
How to Create A Bitmoji Classroom:
If you haven’t created a Bitmoji classroom yet, here’s a quick and simple video tutorial that I created for my teachers over the summer. It’s pretty basic, just to get them started, but you can find so many more videos on YouTube. Don’t forget to also check out the videos on Mrs. Talk Techie’s channel! I would start here on her AMAZING Bitmoji Comprehensive Guide.
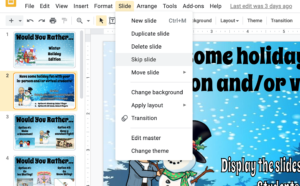
Time Savers #1: How to Present Google Slides Without the Slides Bar:
Once you have your virtual classroom set up, you will want to “SKIP” all slides except for your home page. To skip a slide, go up to SLIDE and select “SKIP SLIDE”. Do this for all your slides except the main one. Then make sure you have a link on each page that will take you back to home or to the different pages within your slide deck.
Once you are ready to publish it, go to SHARE and copy the link. (Make sure you have share settings set the way you want them to be!) Then paste the link in your browser but delete EVERYTHING AFTER the last /. Then after the / add “preview?rm=minimal”. For example, if I was wanting to change this link: https://docs.google.com/presentation/d/1JmnImvzKPUocWQ91BDfkC-5xbgHU5IvaFJnbZvXUoDk/edit?usp=sharing
I would delete everything in bold “edit?usp=sharing” and replace it with “preview?rm=minimal“. So the new link would look like this: https://docs.google.com/presentation/d/1JmnImvzKPUocWQ91BDfkC-5xbgHU5IvaFJnbZvXUoDk/preview?rm=minimal
This has really been a game changer for me, and has made my life so much easier when I’m creating activities for my virtual students. I hope it helps you too!
Time Savers #2: How to Remove adds from YouTube Video Links:
I just heard about two different ways to get rid of all the extra ads and videos on a YouTube link. The first way is to add a dash “-” in between the “t” and the “u” in the word YouTube in the link. The second way is to add “_popup” between the word “watch” and the “?”. Both methods work, and are a game changer for me! I’ve slowly started going back to redo all my YouTube links using this trick so students aren’t distracted by all the other stuff on a YouTube link!
Original #1: https://www.youtube.com/watch?v=JKtY3r2WuEo
Method #1 (no popups or videos): https://www.yout-ube.com/watch_popup?v=JKtY3r2WuEo
Original #2: https://www.youtube.com/watch?v=JKtY3r2WuEo
Method #2 (no popups or videos): https://www.youtube.com/watch_popup?v=JKtY3r2WuEo
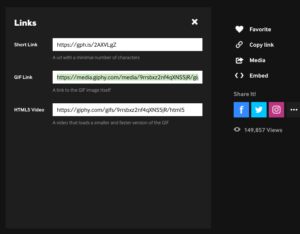
Time Savers #3: How to add fun animated GIFS to your slides:
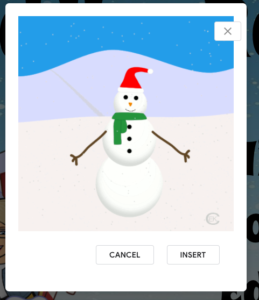
The other thing I’ve had some fun using is GIPHY.com to insert animated gifs into my Google Slide’s activities. Once you find the GIF you want, click on it and click on “Copy Link” and then “Copy GIF Link”.
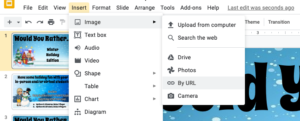
Then go to your Google Slides and click on “Insert Image” and then “By URL” and paste the link. Then click “Insert”
I’ve used this website to create two fun winter games after seeing examples of them for the Thanksgiving Break. You can see them both here:
Time Savers #4: Bookcreator for a New Look:
Finally, my friend and BEYOND AMAZING librarian, Stephanie Beasley, introduced me into the wonderful world of Bookcreator.com. She used it to create this FANTASTIC ebook that I shared with my students before our Thanksgiving break. Click here to check it out!
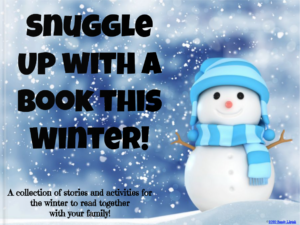
I’ve been playing around with it over the last couple of days, and used it to create a “Snuggle Up with a Book This Winter” book. I pulled together all kinds of winter stories and activities that I thought my students would like. My plan is to share this before my students leave on our two-week winter break, and hopefully encourage them to READ and LEARN! You can check it out here.
I’m not as well versed with this as I am with Google Slides, but it does have some really fun features that I think would be exciting to share with students. I think they would LOVE to create their own books using BookCreator, and it’s super easy to figure out. Plus they just came out with some new enhancements that you can read about here!
Time Savers #5: Organizing Supplies
My last idea to share with you was something that I spent a lot of time thinking about before we went back in person. I had always had supplies out on my tables for students to share….things like crayons, pencils, and markers. Going in to this year with all the Covid-19 protocols, I knew I was going to have to change the way I did things.
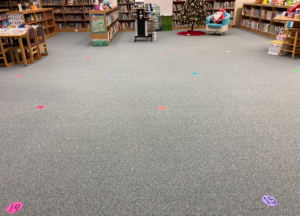
One of the first things I did was move all my tables to the outside edges of the library to make a big open space where my students could sit 6 feet away from each other. I use SitSpots to hep designate their spots.
Then I purchased a set of clipboards for each grade level. (I found a great deal on Amazon for a set of 6 different colored plastic clipboards, so I purchased 18 sets thinking our numbers would be low per grade level with only half the kids coming back in person.) I already had a set of colored baskets from Target’s dollar aisle so it worked out perfectly!
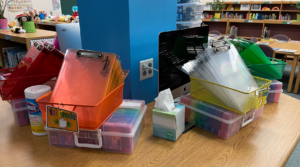
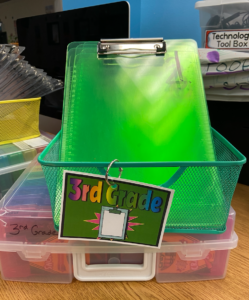
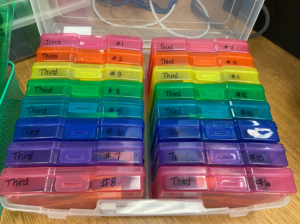
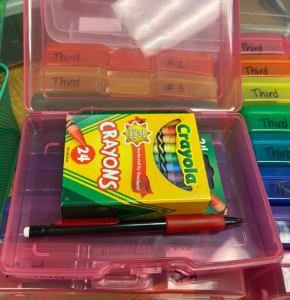
Then I found these great containers at Michaels that I used to hold a crayon box and a pencil so that each student would have their own supply box. In hindsight, I probably only needed 2 or 3 cases since we started requiring students to bring their own supply boxes to Specials, but I went ahead and purchased 6 (one for each grade level). I numbered them to match their numbered SitSpots so they always get the same materials each time they come to the library.
Now, when students come to the library, I just hand out the clipboards and supply boxes (if they need one) and wipe them down after they leave so they are sanitized for the next day.
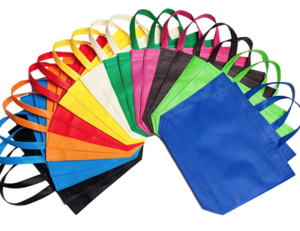
Finally, my principal also purchased these canvas bags so that students could easily carry 1) their school box, 2) their device, and 3) library books to and from Specials. That has made a huge difference as well!
These are just some of the things that have made my life a little easier this year. I hope they help you too! If you’re interested in how I use Choice Boards for my lessons with my in-person AND virtual students, you can read my blog posts about it below!
Click here to read about Lower Grade Choice Boards
Click here to read about Upper Grade Choice Boards
I’d love to hear about any cool tricks or time savers that you’ve used this year to help make your life easier!


Resources for librarians, teachers, parents, & grandparents